一、概述
Fragment(碎片,片段)是在Android 3.0后才引入的,主要的目的是为了实现在大屏幕设备上的更加动态更加灵活的UI设计。这是因为平板电脑的屏幕比手机大得多,所以屏幕上可以放更多的组件,而不是简单地只是把手机上的组件放大。所以Fragment在应用中的是一个可重用的模块化组件,它有自己的布局、自己的生命周期,在一个Activity中可以包含多个Fragment。
二、在Activity中加载Fragment
Fragment的加载方式包含两种:静态加载和动态加载。静态加载很简单,我们只需要把Fragment(片段)当成普通UI控件放到界面Layout中就行;动态加载稍微复杂一点,需要用到事务。
三、静态加载
在Activity中静态加载Fragment的过程分为三步:
- 创建一个
Layout文件,就是我们的Fragment的UI界面 - 创建一个类继承
Fragment,然后重写里面的onCreateView方法,将Fragment的Layout变成View - 在
Layout布局文件中声明fragment,android:name属性里是我们上面创建的类,另外,fragment必须用id或tag作为唯一标识
综上,就是Fragment静态加载的内容。下面来看一个示例:
首先,是Fragment的UI布局myfragment.xml文件,如下:
<?xml version="1.0" encoding="utf-8"?>
<LinearLayout xmlns:android="http://schemas.android.com/apk/res/android"
    android:layout_width="match_parent"
    android:layout_height="match_parent"
    android:orientation="vertical" >

    <TextView
        android:id="@+id/textView"
        android:textSize="20sp"
        android:layout_gravity="center"
        android:layout_width="wrap_content"
        android:layout_height="wrap_content"
        android:text="Fragment示例" />

</LinearLayout>
然后,创建类MyFragment.java,继承Fragment:
package com.example.myfragment;

import android.annotation.SuppressLint;
import android.app.Fragment;
import android.os.Bundle;
import android.util.Log;
import android.view.LayoutInflater;
import android.view.View;
import android.view.ViewGroup;

@SuppressLint("NewApi")
public class MyFragment extends Fragment{

 @Override
 public View onCreateView(LayoutInflater inflater, ViewGroup container,Bundle savedInstanceState) {
  Log.d("Fragment", "onCreateView");
  // 将myfragment Layout文件转化为View
  //返回转化来的View
  return inflater.inflate(R.layout.myfragment, container, false);
 }
}
最后,我们需要在activity_main.xml中声明fragment标签:
<RelativeLayout xmlns:android="http://schemas.android.com/apk/res/android"
    xmlns:tools="http://schemas.android.com/tools"
    android:layout_width="match_parent"
    android:layout_height="match_parent"
    android:paddingBottom="@dimen/activity_vertical_margin"
    android:paddingLeft="@dimen/activity_horizontal_margin"
    android:paddingRight="@dimen/activity_horizontal_margin"
    android:paddingTop="@dimen/activity_vertical_margin"
    tools:context="com.example.myfragment.MainActivity" >

    <fragment
        android:name="com.example.myfragment.MyFragment"
        android:id="@+id/myfragment_1"
        android:layout_width="wrap_content"
        android:layout_height="wrap_content"
         />

</RelativeLayout>
android:name属性中是MyFragment.java的全名,android:id中是Fragment的唯一标识(这个必须得加,否则报错,也可用android:tag属性来作唯一标识)。
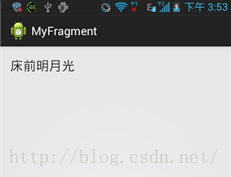
下面是MainActivity的代码,我们在这里将Fragment中的那行字改了一下,由"Fragment示例"改成了"床前明月光":
package com.example.myfragment;

import android.os.Bundle;
import android.support.v7.app.ActionBarActivity;
import android.widget.TextView;


public class MainActivity extends ActionBarActivity {

    @Override
    protected void onCreate(Bundle savedInstanceState) {
        super.onCreate(savedInstanceState);
        setContentView(R.layout.activity_main);
        //做一个简单的UI操作,证明静态加载时我们可以直接获取到
        //Fragment中的UI控件
        TextView tv = (TextView) findViewById(R.id.textView);
        tv.setText("床前明月光");
    }
}
运行后可看到结果:
四、动态加载
实现动态加载,我们需要先了解Fragment事务。熟悉数据库的同学都知道,事务指的就是一种原子性、不可拆分的操作。所谓的Fragment事务就是:对Fragment进行添加、移除、替换或执行其它动作,提交给Activity的每一个变化。这就是Fragment事务。
Fragment是UI模块,自然在一个Activity中可以不只有一个模块,所以Android提供了FragmentManage类来管理Fragment,FragmentTransaction类来管理事务。我们对Fragment的动态加载就是先将添加、移除等操作提交到事务,然后通过FragmentManage完成的。
通过FragmentManager.beginTransaction()我们可以开始一个事务。在事务中,我们可以对Fragment进行的操作以及对应的方法如下:
添加:add()
移除:remove()
替换:replace()
提交事务:commit()
上面几个是比较常用的,还有attach()、detach()、hide()、addToBackStack()等方法。
我们需要注意的是,Fragment以ID或Tag作为唯一标识,所以remove和replace的参数是Fragment,这个Fragment目标Fragment一致。在下面的示例里,我使用了一个栈记录所有添加的Fragment,然后在移除时使用。
示例:
在上面那个工程的基础上,先修改一下activity_main.xml,主要是加了两个按钮:
<LinearLayout xmlns:android="http://schemas.android.com/apk/res/android"
    xmlns:tools="http://schemas.android.com/tools"
    android:layout_width="match_parent"
    android:layout_height="match_parent"
    android:orientation="vertical"
    tools:context="com.example.myfragment.MainActivity" >

    <LinearLayout
        android:layout_width="match_parent"
        android:layout_height="wrap_content"
        android:orientation="horizontal"
        android:gravity="center"
        >
        <Button
            android:id="@+id/add"
            android:layout_width="wrap_content"
            android:layout_height="wrap_content"
            android:text="添加"
            android:textSize="24sp"/>
        <Button
            android:id="@+id/remove"
            android:layout_width="wrap_content"
            android:layout_height="wrap_content"
            android:text="移除"
            android:textSize="24sp"/>

     </LinearLayout>

    <!-- 这个LinearLayout里放置Fragment -->
    <LinearLayout
        android:id="@+id/fragments"
        android:layout_width="match_parent"
        android:layout_height="wrap_content"
        android:orientation="vertical"
        ></LinearLayout>


</LinearLayout>
MainActivity代码,细节写在了注释里:
package com.example.myfragment;

import java.util.Stack;

import android.annotation.SuppressLint;
import android.app.Fragment;
import android.app.FragmentManager;
import android.app.FragmentTransaction;
import android.os.Bundle;
import android.support.v7.app.ActionBarActivity;
import android.view.View;
import android.view.View.OnClickListener;
import android.widget.Button;


public class MainActivity extends ActionBarActivity implements OnClickListener{

 private Button add;	// 添加Fragment
 private Button remove;	// 移除Fragment

 // Fragment管理器
 private FragmentManager manager;

 // 使用一个栈记录所有添加的Fragment
 private Stack<Fragment> fragmentStack = new Stack<Fragment>();

    @SuppressLint("NewApi") @Override
    protected void onCreate(Bundle savedInstanceState) {
        super.onCreate(savedInstanceState);
        setContentView(R.layout.activity_main);
        add = (Button) findViewById(R.id.add);
        remove = (Button) findViewById(R.id.remove);
        //给两个按钮注册监听器
        add.setOnClickListener(this);
        remove.setOnClickListener(this);
        //获取Fragment管理器
        manager = this.getFragmentManager();


    }

 @SuppressLint("NewApi") @Override
 public void onClick(View v) {
  // TODO Auto-generated method stub
  MyFragment fragment;
  FragmentTransaction transaction;
  switch(v.getId()){
  // 添加Fragment
  case R.id.add:
   // 新建一个Fragment
   fragment = new MyFragment();
   // 将ID添加到栈中
   this.fragmentStack.push(fragment);

         // 开启一个新事务
   transaction = manager.beginTransaction();
   // 使用add方法添加Fragment,第一个参数是要把Fragment添加到的布局Id
   // 第二个就是要添加的Fragment
      transaction.add(R.id.fragments, fragment);
      // 提交事务,否则添加就没成功
      transaction.commit();
   break;
  // 移除Fragment
  case R.id.remove:
   // 新建一个Fragment
   // 开启一个新事务
   transaction = manager.beginTransaction();
   // 使用add方法添加Fragment,第一个参数是要把Fragment添加到的布局Id
   // 第二个就是要添加的Fragment
   if(!this.fragmentStack.empty())
    transaction.remove((
        this.fragmentStack.pop()));
      // 提交事务,否则添加就没成功
      transaction.commit();

   break;
  }
 }
}
最后的结果图:
Fragment可以添加也可以移除。
